Recommended for those who already have experience applying adhesives, in this method drying is instantaneous and you can already work applying varnish if you wish.

For beginners who want to properly adjust image positioning, eliminate bubbles and adjust
the cut of the sticker.

In this video we show how to follow the application on stringed instruments, we recommend the use of felt spatula and heat blower (or hair dryer) to adjust the corners.
Avoid direct contact (hands) on the printed part, always use the spatula.
If you do not have a felt spatula, use a spatula or cardboard always covering it with a thin flannel, this will avoid scratching the adhesive.
The sticker will not spoil if you accidentally stick to each other, or glue wrong, just remove, reheat the affected area and within seconds you can reapply.
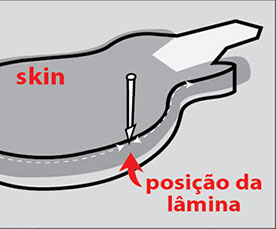
For cutting, we recommend using a new blade stylus, just supporting and cutting vertically (without the tip touching the instrument)
Cut detail
Varnish Resistance
CGW Manual Process # 2
First cut the adhesive, then make the application.


There are 2 methods we use for adhesive application,
Please check both information before starting your Skin application.
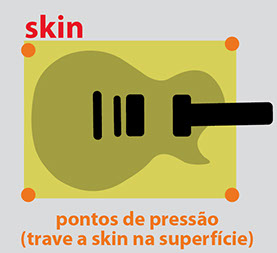
Position the instrument body on a flat surface.
Remove the liner (paper that protects the adhesive glues).
Apply from left to right by pressing the orange dots on the image to lock the sticker above the body.
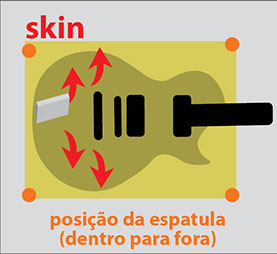
With the felt spatula, make movements from the inside out, pushing the air out of the instrument body. side image >>>
• If you need to remove a part for adjustment or eliminate microbubbles, heat a few seconds with a blower, wait for 5 seconds for the adhesive to cool down, and spatulate the desired area again.
• Always avoid direct contact of hands and fingers on the surface of the adhesive at the time of application so as not to stain or wear the print. (always use the spatula).
In the cavities of the caps, bridge, keys, apply over the skin and make the cut in the finishing.
Use a new blade stylus, keeping it 90 ° inclined to easily cut the adhesive.
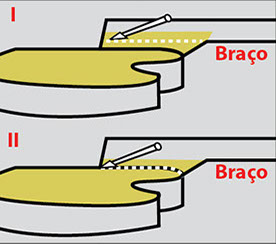
(I) On the arm, spatulate until it touches the skin on the arm, cut above the desired limit (loosely), (II) spatulate again to fit the crease and discard the excess.
Allow at least 1 hour to rest in dry application before varnishing.
There are several ways to apply, we use the simplest explanatory method.
The entire process of application and handling process is the responsibility of the user.
We are not responsible for handling and application.
If in the application the skin gets to knead, stick to each other, crease, heat a few seconds and let it stretch and restart the process.
Instrument Care / Disassembly:
Remove strings (body part only if not applied to headstock)
Remove or lower: Pickups, Knobs, Bridge so the surface is flat.
Or apply by cutting out the cavities as the adhesive approaches the points (eg cut the smaller bridge area, apply and finish)
Necessary materials
Skin CGW
Felt Spatula
(if using spatula / plastic card cover with thin falnela not to scratch the sticker)
Heat Blower or Hair Dryer
New Blade Stylus

Instrument Care / Disassembly:
Remove strings (body part only if not applied to headstock)
Remove or Lower: Pickups, Knobs, Bridge
Download the information in the PDF below.
Necessary materials
Skin CGW
Plastic spatula (covered with a flannel)
NEUTRAL Water and Detergent
Heat Blower or Hair Dryer
New Blade Stylus